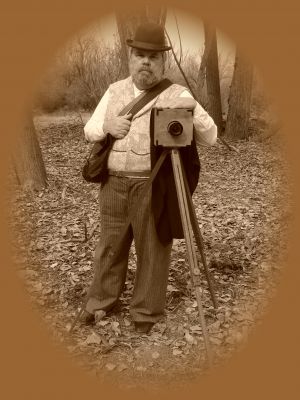
 As I wrote in this blog’s first post, at a Civil War event this past summer I shot photos with my digital SLR while dressed in my 1840s infantry uniform (dotty old Mexican War veteran that I am). Another gentleman, who turned out to be one of the Las Golondrinas docents, was also taking photos that day. He was dressed in a period-looking black jacket and pants, white shirt and stock (tie), and appropriate headgear. As in my case, his modern equipment clashed with his vintage impression.
In the days following the event I began to develop a plan to address this temporal discord. The goal was to build something that looked like a Nineteenth Century photographic camera, but wasn’t. Instead, the box of the camera would house and hide my modern SLR. Keeping with the theme – Penny-pinching Outfitting – I was determined to follow the quickest and cheapest route to my goal.
I have the rudimentary skills and the tools to build both the camera enclosure and the tripod from scratch, but I remembered to check ebay first. Happily, several antique-looking wooden tripods were available and in a few days what I hoped would be a good example was in the mail headed my direction. As I recall, the total price including shipping amounted to around $40.
I’m one of those folks who, armed with only a torn and faded mental catalog of things seen long ago, will spend hours browsing hardware, electronics, and surplus stores Imagineering; searching for just the right gizmo needed to bring an idea to life. Now I needed a wooden box, approximately 8” cubed, in which to hide the camera. Visiting Michael’s then Hobby Lobby , I found a hinged wooden cube of a box just large enough to do the job for less than $10.
Step 1 was to mark the exact center of what would become the face of the camera and use a hole saw to cut the opening through which the lens would protrude. I measured the maximum diameter of my fattest lens and made the opening just a bit (about one-quarter inch) larger.
Step 2 involves determining how and where to mount the box to the top of the tripod. My tripod has a large flat top surface – probably to mount a surveyor’s theodolite – with a threaded hole in the center. I drilled a 3/8” hole in one side of the box and attached it to the tripod with a ¼”-20 hex bolt and fender washer. Since the bolt protruded through the underside of the plate I was able to add a jamb nut to prevent it form working loose.
 Step 3 was to stain the box and to attach a piece of black cloth to the top and sides of the box to serve as the photographer’s hood. This essential thematic element was needed during focusing, which the photographer accomplished by examining the dim image cast upside down by the lens onto a piece of frosted glass installed temporarily in the slot that would hold the glass plate negative during exposure.
Step 4 was to mount the camera. While I continue to imagineer a mechanism that will allow me to quickly rotate the SLR camera 90 degrees inside the box (for both landscape scenes and vertical portraits), I carved a form-fitting cradle from a block of craft foam that fits snugly inside the box. For now it’s a simple matter of extracting the cradle and camera from the box, rotating it 90 degrees, and replacing it.
Step 5 involves creating a brass cylinder to camouflage the modern lens. This I made from a strip of K&S-brand sheet brass purchased from the local model shop. I cut the brass to the width desired, formed it in a cylinder, trimmed it (leaving about 1/8” overlap) and soldered the ends together. With luck on my side, the cylinder proved to be a snug fit on the rubber zoom ring of my lens.
I must admit that I leave the camera in full automatic mode (auto exposure and auto focus); I made sure that the camera box and the brass cylinder do not interfere with the movement of the focus ring. I also turn off the built in flash and use a wired remote to trip the shutter. The lid of the box now faces the rear with the hinges at the bottom; this keeps the camera secure in the box during transport around the battlefield.
