Monday, October 5, 2009

The $10 Box Camera Enclosure

Another Penny-pinching Outfitting Story

As I wrote in this blog’s first post, at a Civil War event this past summer I shot photos with my digital SLR while dressed in my 1840s infantry uniform (dotty old Mexican War veteran that I am). Another gentleman, who turned out to be one of the Las Golondrinas docents, was also taking photos that day. He was dressed in a period-looking black jacket and pants, white shirt and stock (tie), and appropriate headgear. As in my case, his modern equipment clashed with his vintage impression.

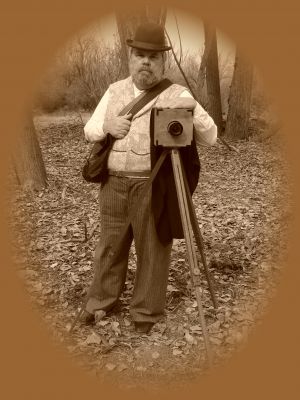
In the days following the event I began to develop a plan to address this temporal discord. The goal was to build something that looked like a Nineteenth Century photographic camera, but wasn’t. Instead, the box of the camera would house and hide my modern SLR. Keeping with the theme – Penny-pinching Outfitting – I was determined to follow the quickest and cheapest route to my goal.

I have the rudimentary skills and the tools to build both the camera enclosure and the tripod from scratch, but I remembered to check ebay first. Happily, several antique-looking wooden tripods were available and in a few days what I hoped would be a good example was in the mail headed my direction. As I recall, the total price including shipping amounted to around $40.

I’m one of those folks who, armed with only a torn and faded mental catalog of things seen long ago, will spend hours browsing hardware, electronics, and surplus stores Imagineering; searching for just the right gizmo needed to bring an idea to life. Now I needed a wooden box, approximately 8” cubed, in which to hide the camera. Visiting Michael’s then Hobby Lobby , I found a hinged wooden cube of a box just large enough to do the job for less than $10.

Step 1 was to mark the exact center of what would become the face of the camera and use a hole saw to cut the opening through which the lens would protrude. I measured the maximum diameter of my fattest lens and made the opening just a bit (about one-quarter inch) larger.

Step 2 involves determining how and where to mount the box to the top of the tripod. My tripod has a large flat top surface – probably to mount a surveyor’s theodolite – with a threaded hole in the center. I drilled a 3/8” hole in one side of the box and attached it to the tripod with a ¼”-20 hex bolt and fender washer. Since the bolt protruded through the underside of the plate I was able to add a jamb nut to prevent it form working loose.

Step 3 was to stain the box and to attach a piece of black cloth to the top and sides of the box to serve as the photographer’s hood. This essential thematic element was needed during focusing, which the photographer accomplished by examining the dim image cast upside down by the lens onto a piece of frosted glass installed temporarily in the slot that would hold the glass plate negative during exposure.

Step 4 was to mount the camera. While I continue to imagineer a mechanism that will allow me to quickly rotate the SLR camera 90 degrees inside the box (for both landscape scenes and vertical portraits), I carved a form-fitting cradle from a block of craft foam that fits snugly inside the box. For now it’s a simple matter of extracting the cradle and camera from the box, rotating it 90 degrees, and replacing it.

Step 5 involves creating a brass cylinder to camouflage the modern lens. This I made from a strip of K&S-brand sheet brass purchased from the local model shop. I cut the brass to the width desired, formed it in a cylinder, trimmed it (leaving about 1/8” overlap) and soldered the ends together. With luck on my side, the cylinder proved to be a snug fit on the rubber zoom ring of my lens.

I must admit that I leave the camera in full automatic mode (auto exposure and auto focus); I made sure that the camera box and the brass cylinder do not interfere with the movement of the focus ring. I also turn off the built in flash and use a wired remote to trip the shutter. The lid of the box now faces the rear with the hinges at the bottom; this keeps the camera secure in the box during transport around the battlefield.
Wednesday, September 9, 2009

The $50 Cross-draw Holster (another Penny-pinching Outfitting Story)

For me, ‘Easy’ does not equate to ‘Fun’ – that’s been a constant theme in my life, especially in my hobbies. I’m a long-suffering Volkswagen owner; I ‘play’ with European trains; I (attempt to) reenact the US-Mexican War period (when I’m not photographing CW battles). Compared to my choices, Toyotas, the Atchison, Topeka, and Santa Fe, and the Civil War, are easy!

While developing my photographer persona, I surmised (rightly, I believe) that the average mid-Nineteenth-Century frontier photog would likely avail himself of some form of personal protection when out in the field. For the sake of economy, why not put my Mexican War era .36 cal. Colt Paterson to double duty? I only needed to find a holster.

But there’s the rub! With the larger and later Colts being immensely more popular, finding a ready made, civilian holster for the Paterson is an exercise in futility – never mind that I’m also a lefty. So, rather than paying for custom work, I decided to try my luck at leathercraft.

I wanted a cross-draw rig that could be worn unobtrusively under a coat yet wouldn’t give the impression that I was some kind of gun slinging polecat. I read a few how-to articles on wet-forming leather and gathered some holster patterns. I then made a full size pattern out of one-eighth inch thick plastic padding sheets by wrapping the sheet around the gun and stapling along the weapon’s perimeter.

I then cut the pattern close to the staples, removed them, and laid the pattern out flat. Following a design for a cowboy action cross-draw holster, I worked out the position of the holster’s two ‘ears’ that would later be stitched to the belts that anchor the holster in place on my right flank. To complete the plan, I transferred the shape to a piece of butcher paper, cleaned up the lines, and cut it out.

With paper pattern in hand, I visited the local Tandy Leather concessionaire to peruse the scrap bins in search of a suitable piece of tanned leather for the holster. Once that was found, I laid hands on a couple of tanned belt blanks to match the scrap, and gathered a couple of bridle buckles and a few other pieces of hardware needed to complete the task.

Returning home, I cut the holster out and briefly immersed it in the kitchen sink. I covered the pistol in plastic kitchen wrap, wrapped it with the leather (clamped along the seam with large vinyl covered spring clamps), and left it to dry overnight.

Next morning, I removed the pistol and marked the leather for stitching. I had previously purchased a sewing awl at Harbor Freight (cat. #91812) and it proved to be the perfect tool. Rather than attempt to muscle the needle through the leather, I used a 1/16” drill bit in a portable drill to bore sewing holes ¼” apart. To keep everything on track and aligned, it seemed prudent to drill only five or six holes at a time, then stitch.

It’s important to consider the order of work carefully. I almost flubbed up by stitching the holster closed before stitching one of the belt mounts that attached to the back. To complete the ‘mechanicals,’ I crafted a leather plug to close the barrel end off to dirt and crud and stitched it in place, then installed the buckles and punched the buckling holes. Though the shoulder strap has a buckle adjustment, I added a bit of craftsmanship punching a set of adjustment holes where it meets the holster and stylishly tying the two pieces together with a length of rawhide lace.

I completed the work by applying two coats of matte acrylic leather sealer. To help protect my clothing from dye leaching out of the leather, I lined the back side of the shoulder strap with white felt, gluing it in place with contact cement. This didn’t entirely prevent staining and I suspect that I will have to go back and stitch the felt in place, too; I always seem to have bad luck with glue!

Tuesday, August 25, 2009

The $45 Baker Tent
(Continued from yesterday)

Turning again to Harbor Freight, I found their Number 38109, 9’ x 12’ canvas drop cloth (times three), to be the ideal starting point for a home made Baker Tent. The list price is $16.99 each, but they happened to be on sale for $14.99 on the day I visited the store. The 10 oz. cotton canvas has a bit of a coarse weave and likely won’t acquit itself too well in even a moderate rain storm, but since I won’t be camping in the tent, that’s of little concern to me. The material is light enough to sew using a typical home sewing machine equipped with a heavy duty needle to handle heavy thread.

The factory-finished edges of the drop cloths are well done; I plan on retaining as many of these edges as possible. With three 9’ x 12’ drop cloths, it is possible to construct a 9’ x 8’5” tent with a 6’ high opening and still have a few extra pieces left (for hand lettered banners advertising the studio). Here are my patterns for cutting the three drop cloths (#1 will remain uncut, creating the back and the roof of the tent; the top of #3 will become a painted artistic backdrop that will hang inside the tent):

Monday, August 24, 2009

The $45 Baker Tent
(the first of several Penny-pinching Outfitting Stories)


You can't be around the reenacting scene for very long before you start to realize, "Dang! This stuff can get awful expensive!" $250 for a uniform, $500+ for a long gun, $100 for a pair of stiff, pain-inflicting, blister-inducing brogans (you can buy a pair of nice, ergonomically pleasant Clarks for that kind of money!); and that's just the beginning. There's personal gear, camp gear, battle gear, and various and sundry accessories that no self-respecting reenactor could possibly do without.

As was the case in the middle 1800s, the sutlers pretty much have us by the short ones. To be fair, they generally produce a good product at a somewhat reasonable Twenty-first Century price (except the brogans!). But for anyone inclined to make some of his or her own gear, it's kinda irritating that only the sutlers seem to know how to get their hands on period-correct 'raw' materials needed to produce the things reenactors need (and want).

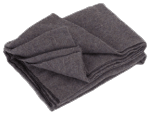
The $45 Baker Tent has its origins in the $8 Infantry Blanket Incident. Let me explain. A post to one of the reenactor mailing lists pointed out that a cheap, mostly wool gray blanket sold by Harbor Freight makes a reasonably good stand-in for the cheap, mostly wool gray blanket once issued by the U.S. Army. Better still, if $8 was still too rich for the blood, one need only wait for the inevitable sale that would knock a couple of bucks off the price.

The $8 Infantry Blanket Incident reminded me that acceptable, non-traditional, inexpensive options occasionally do turn up; it’s just a matter of being observant and remaining alert to the possibilities.

Once I realized it would be handy and somewhat plausible to have a portable portrait ‘studio’ to take into the wilderness, my thoughts immediately turned to the versatile Baker Tent. As you can see from the illustration above, this type of tent has a large entrance covered by a draping flap that, with the addition of a pair of poles and two lines, doubles as an awning. Sutler prices for an ‘authentic’ Baker start at around $400 and go up from there.

A short historical interlude about the Baker Tent: Some folks believe that the design has its roots in World War I and the name stems from its supposed use as a shelter in which army cooks baked bread. But knowledgeable researchers generally agree that the design is much older than that; from written descriptions it appears that the Baker Tent goes back to at least the time of the Napoleonic Wars (1803-1815). As for the name, it seems generally accepted that ‘baker’ refers to the tent’s similarity in shape to the traditional reflector oven, used to bake bread goods next to the cooking fire using reflected heat.

More in the next post....

Friday, August 21, 2009

petites Cartes de Visite

Along with taking photos at C.W. events and posting them somewhere for all to see, I became inspired to offer something unique to local C.W. reenactors. The inspiration came while learning about Carte de Visite. I wrote about CDV a couple of days ago.

As I have no wish to reenact the tedious camera, darkroom, and scrapbooking processes required to exactly duplicate an authentic CDV (and few likely would want to sit perfectly still for the minutes required to capture an image), I have come up with a simplified version using a modern camera (disguised as a wooden box camera), photo editing software (Corel PhotoPaint) to crop and sepia-tone the images, and sheets of ivory colored business card computer paper.

Since the resulting product is a bit smaller than the original CDV, I have dubbed these petites Cartes de Visite. I make them for the cost of materials (about $2.00 for ten cards).

Thursday, August 20, 2009

About...James Gardner (1829-??)

I'm not sure how widespread the practice, but occasionally one will come across a reenactor who has selected a specific, once-living person upon which to base his or her impression. After studying various aspects of Civil War era photography, I thought it might be interesting to do something similar by introducing myself as "Mr. so-and-so, photographer."

James Gardner and his more famous elder brother Alexander (in the photo shown here), were among the dozens of photographers employed by Matthew Brady, probably the most well-known of Civil War shutterbugs. The Gardner brothers were immigrants from Scotland who were in the proverbial right place at the right time when photography exploded on the scene.

By the middle of the War, Alexander, and possibly James as well, left Brady's employ. Alexander's life is reasonably well documented - his eulogy is in the Library of Congress - but it is not precisely known what happened to James. Interestingly, the 1880 Census does list a James Gardner, fifty-one years of age, of Scottish birth, widowed, living in California, and working as a herder. Could this be our fellow?

I chose to base my impression on James Gardner because his brother Alexander looks a lot like my brother Kirk, and because the relative lack of documentation about his life and exploits does not definitively rule out his possible presence at the Battles of Valverde and Glorieta, does it?

Wednesday, August 19, 2009

Victorian Era Photography

With the development and diffusion of glass-plate photography around the middle of the Nineteenth-century, came the first real opportunity for the average citizen to be a consumer of this revolutionary new technology.

Earlier photographic systems, including the famous Daguerreotype, produced their image directly on the final medium. This meant that only one "print" could be obtained from each captured image. Glass-plate negatives allowed multiple prints to be made on specially-prepared paper using a second photographic process.

An early form of consumer-oriented photography was the "Carte de Visite" (CDV), a photo calling card which became so popular in both the United States and Europe that purpose-designed cameras were built to record multiples of the small images on a single glass plate negative. The typical CDV was around two and one-half inches wide and four inches high. It consisted of a piece of stiff cardstock upon which was glued a slightly smaller albumen photo print. Occasionally, the cardstock base was decorated with a printed border or some other embellishment.

A CDV sent by mail proved to be a easy and inexpensive way for people to "show their face" to friends and family living in a distant city or town. Before long, collecting CDV became a hobby unto itself and albums for storing and displaying these little cards were produced commercially. It is reported that even Britain's Queen Victoria was an avid CDV collector.
About...my Clothing:

From the inside out (skipping the 'delicate unmentionables'), I wear a bib-front cotton shirt, striped wool trousers and a brocade vest made by my wife (with a little help from me) following historical patterns, and calf-length leather boots. In the evening and on a cloudy day, I wear a brown derby; in the sun, a straw 'Sam Houston.' A pocket watch with chain, a pair of Pince Nez reading glasses, and a glass flask of my favorite elixer (Coca-Cola) complete the ensemble.

While 'in the field' I wear a brown leather cross-draw shoulder rig (I made it myself!) to hold my 1836-design Colt Paterson .36 cal revolver; you never know when a rattler (or a 'Johnny Reb') might slither out of the bushes lookin' to do ya' harm!

For winter, I have an old "make do" wool blanket capote; perhaps I'll be able to afford something more modern before the first snows set in!

...my Equipment:

Blatant anachronisms trouble me. At a Civil War event at El Rancho de las Golondrinas, I spent the day furtively shooting photos with my Pentax digital SLR while dressed in my 1840s infantry uniform. It occurred to me that if I were dressed as a civilian of the period and equipped with a primitive-looking box camera, I would fit right in. This got the wheels turning.

I purchased an old, somewhat rustic-looking wooden tripod on ebay for about thirty bucks. Scouring the craft stores, I found a plain pine box large enough to enclose my digital SLR. I've stained the box and cut a hole through which the lens protrudes; I'm still experimenting with ways to mount the camera in the box so that it's easy to switch over from horizontal to vertical format. To camouflage the modern lens, I've built a press-on tubular lens shield from sheet brass.

The whole kit looks passably fine, if I might say so myself!

Tuesday, August 18, 2009

Preface:

Just last week, I created a set of web pages to document my evolving interest in Victorian era photography. I've been dancing on the fringes of the Civil War reenacting community for a couple of years and have just recently decided to take a more active role. Inasmuch as this 'effort' is transformational (and slow paced) it dawned on me that a blog was an ideal vehicle for logging activity (dare we say 'progress'?) on this sort of thing. I've got a lot of plans for the future, but I will take some time at first to write about the important (and hopefully interesting) steps I've taken up to this point.


About...me:

My interest in reenacting stems from an interest in acting that goes back many years: in junior high school I played a member of the River City band in a professional production of "The Music Man" starring Bert Parks, I'm a big fan of Halloween costuming, and living as I do along the El Camino Real de Tierra Adentro, I became interested in the U.S.-Mexican War (1846-1848).

In 2008, I joined the 1st New Mexico Volunteer Infantry because some of the members occasionally effect a U.S.-Mexican War impression. After attending a couple of Civil War events, I decided to participate in that era as an itinerant photographer.